| Lastufka Labs - |
Reference |
Handling Lead - How To Melt Lead
Lead is the densest material that can be cheaply, safely and
easily manipulated into the odd shapes necessary for weighting fast
Grand Prix cars, regatta boats, airplanes and other hobby vehicles.
Still, it involves work over a hot surface or open flame and burn
protection. You wouldn't want to breath any fumes either, though
there don't have to be many.
An adult should melt and pour the lead. If this cannot
be arranged, go get a hammer and start pounding your lead into
shape. It will take some time, energy and creativity to get the
shape you want, but it will be a lot safer. Wear some good gloves;
pounding the lead will make it hot. If nessecary, the lead can be
pounded flat and thin and cut with tin snips. Unfortuneately, two
small pieces of lead can not be smashed together to make a bigger
piece. Hot glue can bind them together in a well.
- Avoid touching lead with your bare hands.
- Avoid melting lead if possible.
|
|---|
|
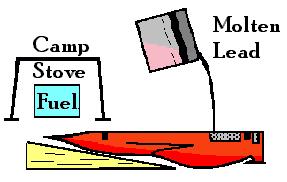
For melting lead, you will need a heat source, preferably some
kind of portable stove you can take out doors in a sheltered area
or your open garage. A propane torch will do if necessary. You will
need a metal container to melt the lead into. A tuna can will do
fine. Tongs with grippers or a good cooking glove will be
important; the can gets very hot.
Other tools are helpful for drilling or carving wells in your
vehicle to pour the lead into if the space has not already been
created.
- Put your vehicle in a jig or held up by scrap wood and clamps,
etc. so you don't have to hold it in your hand. Make sure the top
of the well is level so lead does not run out.
- Place a little more lead in the metal container than you will
need. Some will stick to the sides of the container and some will
be lost as dross. Some may spill out of the well in your
vehicle.
- Place the container on the heating unit. Turn on and heat up
your heating unit until it begins to melt the lead. Though the lead
may not look melted, it may be. Some fish weights and other sources
of lead are coated. This coating needs to be crushed to let the
molten lead out. This can be done with a popsicle stick. Once
melting has begun, it should proceed rapidly. Take care not to over
heat causing noxious fumes.
- Prepare to handle the metal container. Turn off the heat
source. Carefully swirl the contents briefly to gain a little
consistency and force out air bubbles. Work fast, lead begins to
set almost immediately.
- Carefully position the container over the well in the vehicle
and begin to pour. You want to avoid trapping air in the well, so a
thin stream of molten lead is best. Be mindful how you place your
hands, hot gases are traveling upward around the container.
- As the well fills, watch for topping. Stop pouring if it
overflows. Lead will solidify upon contact with a cool surface. It
does not form strong bonds with the surface. Lift or scrape it off
with a flat head screw driver. Trim overruns that are attached to
the lead in the well using a file or small hand saw.
- Let the lead cool for ten minutes before touching.
- Once the lead is cool, you can file it and polish it with a
cloth or buffing wheel or cover with a stick-on label and
finish.
Plan ahead of time how much lead to
melt.
| Lastufka Labs - |
Reference |
| Copyright © 1998, 2002 by Michael Lastufka, All rights reserved worldwide. |