| Grand Prix Racing - |
How To Make A Fast Pinewood Car |
Accessories
Anything you add to your car that did not come from your kit is an accessory. However, accessories may also be parts you carve from your
kit block to build an engine, a spare kit wheel or extra axles used as
engine pipes. Unlike the chassis, your car doesn't rely on these parts to
stay together during a race. Accessories help make your car look like a
real one or achieve some other artistic goal.
| Attach all accessories firmly to your car, unless you know it is legal and have a good reason not to. |
|---|
|
It makes sense to attach most accessories before finishing the body. You
will want doors, hoods, etc.. to be treated with wood putty, sealer, paint
and shellac just like the body. Others will need to wait. Finish pipes,
figures and hood ornaments separately then attach to the finished body.
Decals, interior gauges, windshields and flags go on just before the
shellac or other clear coat.
Decals are some of the most widely used accessories. There are at least
two problems with buying them - 1) It's very hard to find what you need and
2) when you do, it's expensive! So, here's how to make your
own at practically no cost.
Go look in all kinds of car magazines or if you're artistic, draw your
own with color pencils or water color. We found some small patches and
achievement pin pictures in our club's supply catalog. Cut out what you
need with a good pair of scissors or a sharp hobby knife (put a clip board
or something solid behind your work).
After the body or accessory has been painted and is dry, glue the cutout
where you want it. Coat your homemade "decal" with an acrylic clear coat
varnish or a little acrylic sanding sealer. This seals the surface of the
cutout - other clear coatings might cause the color from the backside of
the cutout to show through. Once it is dry, you can coat it with whatever
type of clear finish you use on your car body. The more layers of clear
coat, the deeper the shine and less you will notice the slight edge of the
cutout.
These can be made from the kit block by cutting thin rods and joining
them at angles if desired. We found some plastic clothes hangers with
little curled hooks just right for one car - and we're still using the
hangers! For smaller ones, wire, nails or extra axles work. Finishing nails
often have little dimples in their small heads, which look better than a
flat end. Be careful to predrill holes for wires and nails as they can
split wood if forced. Join them to the car body or engine after
painting.
Transparency film is excellent for making windshields, and cockpits. It
can be cut or bent to shape and scored for corners. Tabs on the film and
slots in the car help hold it in place. It can even be "glue gunned".
To enclose an area with transparency windows, first finish the interior,
exterior and the roof. Test fit the roof and the cockpit; once the windows
are in, it will be very hard to correct any gaps or mismatches. Tab or glue
the windows in place on the inside of the cockpit before putting the roof
on. That way, excess hot glue can be hidden from view.
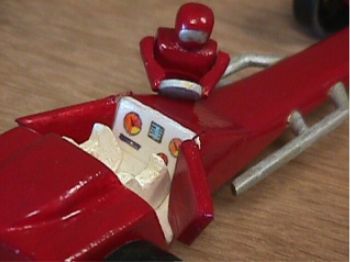
Cut and assemble chairs and steering wheels from thin slabs of the kit
block. See the paragraphs above about decals to make dials and controls on
the dashboard. An opening door can be made by inserting part of a
straightened staple into the bottom of the door and into the car floor. A
shortened staple in a "U" or "L" shape anchors the top of the door.
Clay can be sculpted, painted and coated with shellac nicely. It is not
immune to damage, so use clay figures for interiors or places not likely to
be touched. For lighter more durable figures, use Crayolla Model Magic(tm)
- yes, you really can make figures like the ones shown on the package - you
don't need to be a pro! If you can't afford that, you probably still have
chunks of your kit block. A dremel tool is very good at carving these into
drivers, horses, etc.. Finish them the same way as you do your car.
Carving isn't the only way to build figures from wood. Engines can be
built up easily from small wood blocks. Of course, engines and other parts
can often be used from plastic model kits - just check your rules.
Then there's molding figures. Hobby stores carry supplies so you can
make rubber (latex) or plaster molds. Cast plaster of paris, spackle or wax
in a rubber or plastic mold. Spackle needs a thin layer of vaseline in the
mold as a separator or it sticks to the mold. Cast rubber in a
plaster mold with a vaseline or oil-based separator.
We made a rubber mold of the car detail of a trophy, boiled it in water
to toughen it, laid it in cold sand and cast lead in it for a 5 ounce
reference weight! Though the mold was in good shape afterward, some slow
chemical reaction eventually destroyed it. We've yet to try making a lead
engine.
Try to avoid parts that stick out or are not rigidly attached to the
car. Don't use cloth flags if you care about speed. If you must have a
flag, make it out of transparency film. Turn it in line with the car's
motion, not across it.
Whips are long antenna. Thin piano wire or spring steel rods are good
for this. If you don't have a good wire cutter, you can bend it back and
forth in a vise to break it. Attach it to your car with the rough end
buried in the wood or cap it so no one gets scratched. Check that it is
under the legal height limit.
| Grand Prix Racing - |
How To Make A Fast Pinewood Car |
| Copyright © 1997, 2000, 2001, 2002, 2004 by Michael Lastufka, All rights reserved worldwide. |